Pro Art - Factory Direct
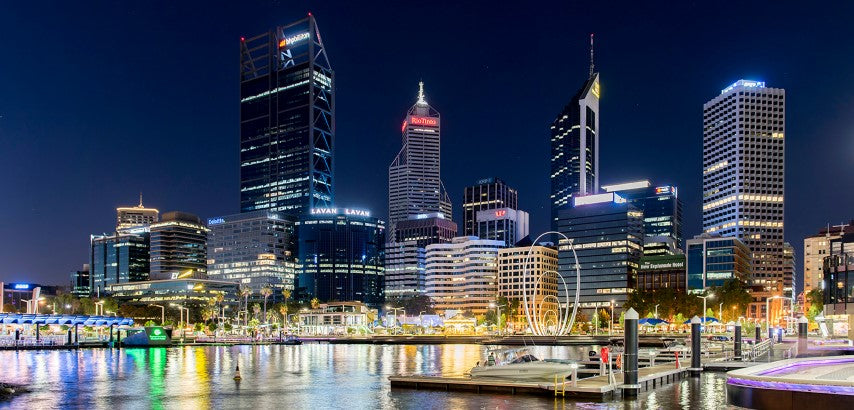
Elizabeth Quay by night - Half Wall Mural
Elizabeth Quay by night - Half Wall Mural
Couldn't load pickup availability
Perth City like you have never seen! Gorgeous rich colours giving you a unique wallpaper mural for your home.
Easy to use and remove, Pro Art murals are a revolutionary concept in wallpaper and production which allows you to transform spaces to create an experience. Installing wallpaper has never been easier!
Full installation instructions included.
Revolutionising the design and production of wallpaper, Pro Art offers a modern twist on decorating today, allowing you to create an experience through limitless designs and easy to use and remove
superior quality paper and imagery.
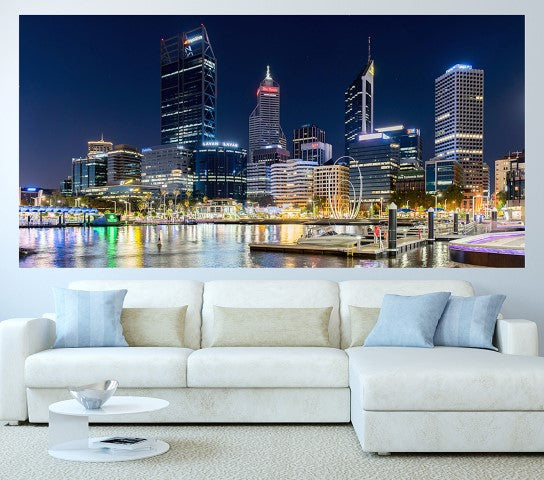
Product description: Easy to install and remove pre-pasted wallpaper mural. The half wall murals have 4-6 panels with a 10mm overlap allowing for easy installation. No glue is required for installation and will not produce any odours or fumes.
Perfect for above the bed!
PRO ART wall murals perfect for your next D.I.Y project. All murals are printed on superior quality pre-pasted odourless wallpaper.
Instructions
Half Wall Mural installation instructions:
Tools required
- Applicator
- Razor-knife (break-off blades)
- 1L spray bottle filled with water only (Pressurised spray bottle for easy application)
- Table or Bench 1.5 - 2 m long
- Drop sheet
- Bucket and sponge or lint free cloth
- Straight edge for trimming
- Spirit Level
Surface Preparation
- Before murals can be applied it is important for the wall to be in a good clean condition, repair any scratches or chips. Allow paint to cure as per paint manufacture’s requirements.
- Any contaminates such as dust, dirt, grease, or defects on the surface such as loose paint can cause adhesion loss and therefore reduce the durability and performance level of the mural.
Installation note
- When handling the mural hold the wallpaper as far into the mural as possible, without wrinkling the wallpaper. This will help avoid transferring oil from fingers and dirt to the edges of the mural, which could result in peeling edges or lifting, which can cause eventual adhesion problems.
Important: If the mural is being installed on a wall which has power points or light switches, turn power off at the main switch and cover power points or light switches to prevent from getting wet
Panel Lay out
Murals come in 4 to 6 panels depending on the size of the mural purchased. Each panel is numbered at the bottom and has overlap marks at both top and bottom, these marks are a guide during installation. Before starting installation, remove from packaging and lay mural out on the floor in order (on a clean, dirt and dust free surface). Make sure you have each panel in the correct order.
- Roll the panel out printed side down on clean table. Using the spray bottle apply an even layer of water then repeat. Make sure that mural is wet and has no dry spots.
To promote even adhesion, wallpaper needs one minute before being hung to absorb the water and active glue. To allow for this, use a technique called “booking” as shown below
Booking
1) Fold the bottom third of the panel over the middle.
2) Then fold over the remaining portion until it slightly overlaps the end of the first portion. Take care to align the edges, and do not crease mural.
3) After waiting for 1 minute then loosely roll the panel to prepare it for hanging.

- Unroll and place panel at the top of the wall lapping the mural pass the corner of the wall and cornice by 10-15mm. Lightly press to hold in place, by running hand across the top 100mm of the mural.
- Slowly work your way from top to bottom lightly press the mural to the wall with your hands working your way out from the centre to the edges at a 45º angle removing any major bubbles.
Note: If mural is not straight gently remove mural from the wall by holding mural and pull at a 90º angle from the wall & repeat Steps 2 & 3. Once you are satisfied the mural is correctly positioned continue.
- Using a spirit level on the opposite edge of the panel away the corner of the wall. Make sure the panel is straight, making sure the panel is still lapped pass the corner of the wall by 10-15mm.
- Once you have the panel in the correct position, continue to work your way from top to bottom lightly press the mural to the wall with your hands working your way out from the centre out to the edges at a 45º angle removing any major bubbles. Repeat step 4 before continuing next step.
- Using the applicator (squeegee). Apply pressure to the mural working your way out from the centre out to the edges at a 45º angle removing any bubbles.
Tips: Pull or drag applicator across the mural, pushing may mark or scratch the mural. Ensure all bubbles are removed from each panel for best final result. Check for bubbles by looking across the mural from the sides. Check all edges of the panel making sure they are firmly applied. Don’t continue with the next panel until all bubbles removed.
- Next wipe off any excess glue and repeat steps 1 to 6, line up the overlap marks at the top and bottom of the previous panel with the edge of the next panel. Adjust to match the image with the previous panel. The last panel will need to be lapped into the corner and onto next wall. Which can be trimmed once you have completed all panels.
- Trimming
Using a new blade (Remember to regularly change or snap off new blade, as a blunt blade will not cut and could tear the mural). Using a straight edge and blade cut off all excess mural. Cutting across the top starting from the first panel you installed then the bottom, then the sides of the wall. Do not press hard as to damage the wall behind the mural. Wipe off all excess glue using a sponge or lint free cloth and bucket of water. Be carefully not to catch or lift any overlaps as you wipe off excess glue.
Custom Murals
Custom sized murals, 10-14 days turnaround!
Contact us today for your FREE quote.
Even on a budget you can decorate your home with the latest trends. Imagine having your own photographs wall size in your own home! The possibilities are endless, from a sophisticated bedroom mural to a relaxing rain forest design, you can have anything you can imagine on your wall.

What is a custom design?

Can I use my own photos?
Yes, you can use one of your own photos! The better the quality the photo is, the better the result. Look for an image at least 2 megabytes and 300 dpi is preferred (don't know what that means, no problem we'll help you). If you're not sure, we are happy to take a look at the photo and help you decide if the quality is good enough to go to your wall size. Just email us to discuss how to send the photo to us.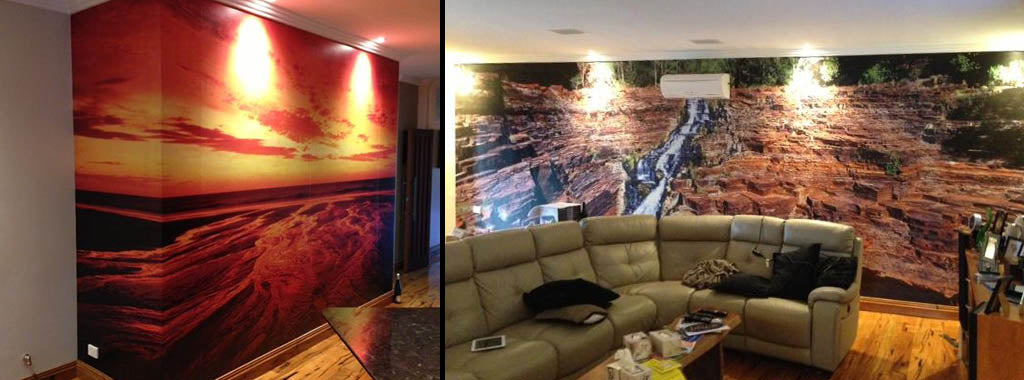

"Amazing pieces of art we love our customs. Thank you, you guys you rock we are telling everyone who you are and how fantastic you are. Carla - WA
How to video
Watch how easy it is to install a full wall mural!
Installing wallpaper has never been easier! PRO ART murals superior quality wallpaper is easy to apply. See our instructional video below.
Our wallpaper is easy to install and remove and is very gentle on walls, our product is featured in many major hospitals throughout Australia. The same wallpaper we offer to you, robust and high quality yet easy to put up with minimal effort! The murals are designed in panels so you can easily place them on the wall, each panel has an overlap mark which is super easy for you to then line up the next panel.
Our wallpaper is very forgiving and can be placed on the wall and moved about. Which means even if you place it on the wall you can simply move it about if you got it slightly in the wrong position. There are no air bubbles you have to fight with! The glue that is behind the mural you can simply wipe away as the video above shows. You dont need fancy tools to install you can find these tools at your local hardware store or you may even have them around the house!
Below we have the paper install instructions that you receive with every purchase, you also get our 1300 number to call for assistance when you are installing your mural.
Gone are the days of the dreaded wallpaper that takes hours to prepare and hours to install! Our product is like no other, and I know you will love it!
But be aware once you have one mural in your home you will need more! Other walls are simply boring without a mural...
Instructions
Half Wall Mural installation instructions:
Tools required
- Applicator
- Razor-knife (break-off blades)
- 1L spray bottle filled with water only (Pressurised spray bottle for easy application)
- Table or Bench 1.5 - 2 m long
- Drop sheet
- Bucket and sponge or lint free cloth
- Straight edge for trimming
- Spirit Level
Surface Preparation
- Before murals can be applied it is important for the wall to be in a good clean condition, repair any scratches or chips. Allow paint to cure as per paint manufacture’s requirements.
- Any contaminates such as dust, dirt, grease, or defects on the surface such as loose paint can cause adhesion loss and therefore reduce the durability and performance level of the mural.
Installation note
- When handling the mural hold the wallpaper as far into the mural as possible, without wrinkling the wallpaper. This will help avoid transferring oil from fingers and dirt to the edges of the mural, which could result in peeling edges or lifting, which can cause eventual adhesion problems.
Important: If the mural is being installed on a wall which has power points or light switches, turn power off at the main switch and cover power points or light switches to prevent from getting wet
Panel Lay out
Murals come in 4 to 6 panels depending on the size of the mural purchased. Each panel is numbered at the bottom and has overlap marks at both top and bottom, these marks are a guide during installation. Before starting installation, remove from packaging and lay mural out on the floor in order (on a clean, dirt and dust free surface). Make sure you have each panel in the correct order.
- Roll the panel out printed side down on clean table. Using the spray bottle apply an even layer of water then repeat. Make sure that mural is wet and has no dry spots.
To promote even adhesion, wallpaper needs one minute before being hung to absorb the water and active glue. To allow for this, use a technique called “booking” as shown below
Booking
1) Fold the bottom third of the panel over the middle.
2) Then fold over the remaining portion until it slightly overlaps the end of the first portion. Take care to align the edges, and do not crease mural.
3) After waiting for 1 minute then loosely roll the panel to prepare it for hanging.
- Unroll and place panel at the top of the wall lapping the mural pass the corner of the wall and cornice by 10-15mm. Lightly press to hold in place, by running hand across the top 100mm of the mural.
- Slowly work your way from top to bottom lightly press the mural to the wall with your hands working your way out from the centre to the edges at a 45º angle removing any major bubbles.
Note: If mural is not straight gently remove mural from the wall by holding mural and pull at a 90º angle from the wall & repeat Steps 2 & 3. Once you are satisfied the mural is correctly positioned continue.
- Using a spirit level on the opposite edge of the panel away the corner of the wall. Make sure the panel is straight, making sure the panel is still lapped pass the corner of the wall by 10-15mm.
- Once you have the panel in the correct position, continue to work your way from top to bottom lightly press the mural to the wall with your hands working your way out from the centre out to the edges at a 45º angle removing any major bubbles. Repeat step 4 before continuing next step.
- Using the applicator (squeegee). Apply pressure to the mural working your way out from the centre out to the edges at a 45º angle removing any bubbles.
Tips: Pull or drag applicator across the mural, pushing may mark or scratch the mural. Ensure all bubbles are removed from each panel for best final result. Check for bubbles by looking across the mural from the sides. Check all edges of the panel making sure they are firmly applied. Don’t continue with the next panel until all bubbles removed.
- Next wipe off any excess glue and repeat steps 1 to 6, line up the overlap marks at the top and bottom of the previous panel with the edge of the next panel. Adjust to match the image with the previous panel. The last panel will need to be lapped into the corner and onto next wall. Which can be trimmed once you have completed all panels.
- Trimming
Using a new blade (Remember to regularly change or snap off new blade, as a blunt blade will not cut and could tear the mural). Using a straight edge and blade cut off all excess mural. Cutting across the top starting from the first panel you installed then the bottom, then the sides of the wall. Do not press hard as to damage the wall behind the mural. Wipe off all excess glue using a sponge or lint free cloth and bucket of water. Be carefully not to catch or lift any overlaps as you wipe off excess glue.
Custom Murals
Custom sized murals, 10-14 days turnaround!
Contact us today for your FREE quote.
Even on a budget you can decorate your home with the latest trends. Imagine having your own photographs wall size in your own home! The possibilities are endless, from a sophisticated bedroom mural to a relaxing rain forest design, you can have anything you can imagine on your wall.
What is a custom design?
Can I use my own photos?
Yes, you can use one of your own photos! The better the quality the photo is, the better the result. Look for an image at least 2 megabytes and 300 dpi is preferred (don't know what that means, no problem we'll help you). If you're not sure, we are happy to take a look at the photo and help you decide if the quality is good enough to go to your wall size. Just email us to discuss how to send the photo to us.
"Amazing pieces of art we love our customs. Thank you, you guys you rock we are telling everyone who you are and how fantastic you are. Carla - WA
How to video
Watch how easy it is to install a full wall mural!
Installing wallpaper has never been easier! PRO ART murals superior quality wallpaper is easy to apply. See our instructional video below.
Our wallpaper is easy to install and remove and is very gentle on walls, our product is featured in many major hospitals throughout Australia. The same wallpaper we offer to you, robust and high quality yet easy to put up with minimal effort! The murals are designed in panels so you can easily place them on the wall, each panel has an overlap mark which is super easy for you to then line up the next panel.
Our wallpaper is very forgiving and can be placed on the wall and moved about. Which means even if you place it on the wall you can simply move it about if you got it slightly in the wrong position. There are no air bubbles you have to fight with! The glue that is behind the mural you can simply wipe away as the video above shows. You dont need fancy tools to install you can find these tools at your local hardware store or you may even have them around the house!
Below we have the paper install instructions that you receive with every purchase, you also get our 1300 number to call for assistance when you are installing your mural.
Gone are the days of the dreaded wallpaper that takes hours to prepare and hours to install! Our product is like no other, and I know you will love it!
But be aware once you have one mural in your home you will need more! Other walls are simply boring without a mural...